 Autumn is in full swing, and my favorite holiday is just around the corner! That’s right, Halloween is just a few weeks away. It’s time to prepare those costumes, select your candy, and get ready for a fun-filled Spooktacular holiday. One of my favorite things to do every October is to decorate our house. And I mean all decked out! Not just the usual fake spiderwebs and Jack-O-Lanterns. Although we still do those as well. Each year I add a few more projects to my Halloween stash.
Some of my favorite memories as a kid center around projects my brother and I made with my mom. And of course, the messier the better. Pumpkin carving and baking pumpkin seeds are among a few of our family’s Halloween traditions. In the spirit of family togetherness, I have prepared a few projects for you to make with your energetic kiddos. Don’t worry guts–I chose some of my cleaner projects.
So true to fashion, just like in my blog Adventures in Motherhood, I have include a complete tutorial for each of these kid friendly projects. I know you’re dying to know what I’ve come up with, and unless you’re impatient like me, you haven’t read ahead to see. We’re going to begin by making some Ghostly and Creepy Crawly Sweet Treats. Then we’re going to make some Monster Candy Boxes. And finally we’ll be assembling some Eyeball Topiaries. Sound fun? Let’s get crafting!
Ghost & Spider Pops
Materials:
– 1 bag of Lolipops (Tootsie Pops, Blowpops, etc.)
– 1 pkg. of Googly Eyes
– 1 pkg. of Black Pipe Cleaners
– 1 spool of 1/4″ Ribbon (cut in 6″ pieces)
– 4 pcs. White Tissue Paper (cut in 6″ x 6″ squares)
– Scissors
– Hot Glue Gun
Assembling the Ghosts:
Plug in your hot glue gun to allow it to heat up and set aside.
Start with one piece of tissue paper and one lollipop. Place the top of your lollipop in the center of your tissue paper. Drape the tissue paper down over the lollipop and gather it at the base.
Take a piece of ribbon and tie it in a knot at the base of the lollipop. Once your ribbon is secure, tie it in a bow.
Using your hot glue gun, place a dab of glue on the back of your Googly eyes and attach them to the front of your lollipop above the bow.
And you’re finished! Say hello to Casper!!!
Assembling the Spiders:
Plug in your hot glue gun to allow it to preheat and set aside.
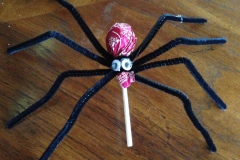
Start with one pipe cleaner and one sucker. Take the pipe cleaner and wrap it tightly around the stick at the base of the lollipop. Repeat this step with three more pipe cleaners to create eight legs.
Using your hot glue gun, place a dab of glue on the back of a set of Googly eyes and attach them to the knot of black pipe cleaners. (The eyes should be facing toward the stick of your lollipop)
Next bend the tips of your pipe cleaners to create you creepy crawly spider legs.
And we’re done! Time to name your Spidey Pops!!! YUM!
Monster Candy Boxes
Materials:
– 1 Kleenex Box, empty
– 1 set of Googly Eyes
– 1 set of sm. Styrofoam Balls
– 1 pc. White Foam Paper
– Acryllic Paint, any color
– Paint Brush
– Scissors
– Hot Glue Gun
Directions:
Plug in your hot glue to allow it to preheat and set it aside.
Take your scissors and cut a hole in your Kleenex box in any shape you prefer – half circle, rectangle, square, etc. This will be your Monster’s mouth, so it’s your choice.
Paint the outside of your box any color you want and decorate it in any fashion you like. (Glitter, polka dots, stripes, etc.) Set it aside to dry.
If you want to have colored eyes, paint them now and set them aside to dry as well.
Time to cut some monster teeth! Using a pencil, draw some jagged crazy monster teeth. Then cut them out using your scissors.
When your paint has dried, use your hot glue gun to attach your teeth to the inside of the box.
Next, use your glue gun to attach your Googly eyes to the styrofoam balls.
Using your scissors, cut off a small slice of your styrofoam balls to create a flat side or base to them.
Using your glue gun, place a glob of glue on the base of your styrofoam balls and attach them to the top for your box.
And we’re finished! Time to name your new Monster Pal!!!
Eyeball Topiaries
Materials:
– 1 sm. Terra Cotta Pot
– 3 (2-3″) Styrofoam Balls
– 1 Wooden Skewer
– 3 Googly Eyes
– 1 piece of newspaper
– Acrylic Paint (any color)
– Paint Brush
– Pipe Cleaners (any color)
– Hot Glue Gun
Directions:
Let’s begin by painting your Terra Cotta pot any color you desire. And set it aside to dry.
Next, paint your styrofoam balls any color you wish. Set them aside to dry.
While your materials are drying, plug your hot glue gun in to allow it to preheat.
Once your pot and styrofoam balls are dry, use your hot glue gun to attach Googly eyes to your styrofoam balls.
Next, place a dollop of glue in the bottom of your pot on the inside. Stuff your scrap piece of newspaper inside of your pot.
Place a dollop of glue on the base of one styrofoam ball and attach it to the top of your pot.
Next, insert a 2″ piece of wooden skewer into the top of your ball, where you want to attach the next ball.
Place a dollop of glue at the base of the skewer. Insert your next ball onto the top of the skewer until it is flush with the top of the last ball. Repeat this step with the last ball.
Insert a 1″ piece of skewer into the top of the last ball. Place a dab of glue along the side of the skewer. Wrap your pipe cleaner around the skewer and twist it into curly cues.
And we’re finished! Find a place to put your fabulous Eyeball Topiary!
I hope you find the time to put together these fabulous monster projects with your little ones. Halloween will be here before we know it – so why not create some family memories. And for more fun-filled crafting tutorials, check out my blog Adventures in Motherhood. Happy Crafting!


